


Here’s what you need to know about hunting with Roosevelt Elk Outfitters.
Before you book your hunt
We want you to know what to expect. Before you book, we’ll have detailed conversations about the elk, the conditions where you’ll hunt, our rates of opportunity and success, and the gear you’ll need. We’re happy to answer questions by phone or email before the hunt and for as long as you need us afterwards.
Once you book your hunt
We’ll send you a contract to review, complete, and sign. Our hunts book quickly, so we require a 50% deposit to hold your spot. The conversations about your upcoming hunt will continue as we go into detail about your options and preferences. You can also expect:
- Periodic calls and/or emails to check on your preparation and progress
- Equipment suggestions and a gear checklist
- Shooting tips
- Advice on how to prepare for your hunt
- Updates on conditions as needed
We can guide you through the process of obtaining your Washington State licenses and tags, and plan for taxidermy and meat transportation.
The day before your hunt
We’re about halfway between Portland and Seattle but we’re well off of Interstate 5, so we recommend that hunters who fly in rent a vehicle and drive to the Lodge, which takes 2-3 hours depending on traffic.
The Friday before your hunt, archers should plan to check your equipment and take some shots, making final adjustments if necessary. Rifle and muzzleloader hunters will meet us at the Pe Ell Sportsman’s Club to confirm zeros, and shoot out to 540 yards. We will send out a ” REO Newsletter” in July to give you the exact location and times to meet us for each hunt.
Once you get to the lodge, you’ll have time to:
- Find your sleeping area and unpack.
- Prepare your gear to hunt the next morning.
- Meet your guide and plan your hunt.
- Get to know your fellow hunters.
- Get a full brief on how we hunt and a full update on the latest game regulations.
- Have dinner.
- Go to sleep and dream of hunting.
The Game
Roosevelt Elk
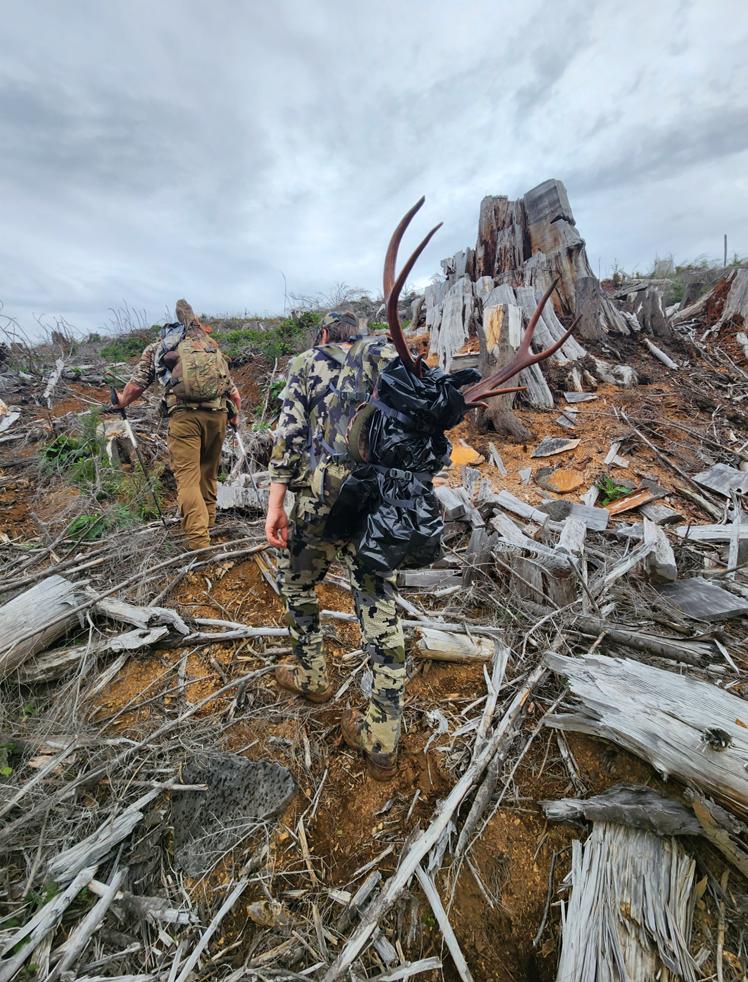
This species occurs only in the rain forests west of the Cascade Crest (the western edges of Washington, Oregon, and British Columbia) and in Alaska. Their antlers are somewhat smaller than those of Rocky Mountain Elk, but their bodies are significantly larger. Mature animals are 6-10 feet long and 2.5-5feet tall at the shoulder. Bulls weigh from 500 to 1,100 pounds, while cows weigh from 375 to 625 pounds. For reference, Roosevelt Elk are roughly 20% larger than Rocky Mountain Elk, about twice the size of Tule Elk, and slightly smaller than an American Quarter Horse. Like all elk, they’re strong and tough. If wounded, they’ll move into the lowest, nastiest cover you can imagine (more about that later).
Black Bear
We hunt coastal black bears, which range up to about 200 pounds in size. When we hunt them in August, they feed on berries so the meat tends to be sweet.
Weather & Habitat
We hunt on huge tree farms on the Pacific Coast of Washington state. They look like easy walking from the road but moving on them can be difficult because they’re rocky, hilly, and steep. They’re also wet which makes them slippery. Thick cover alternates with huge open areas where you can see for miles.
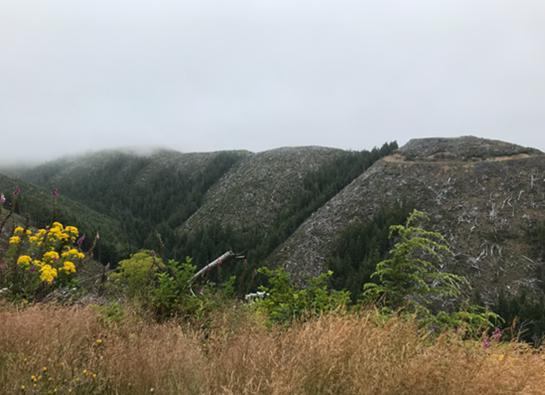
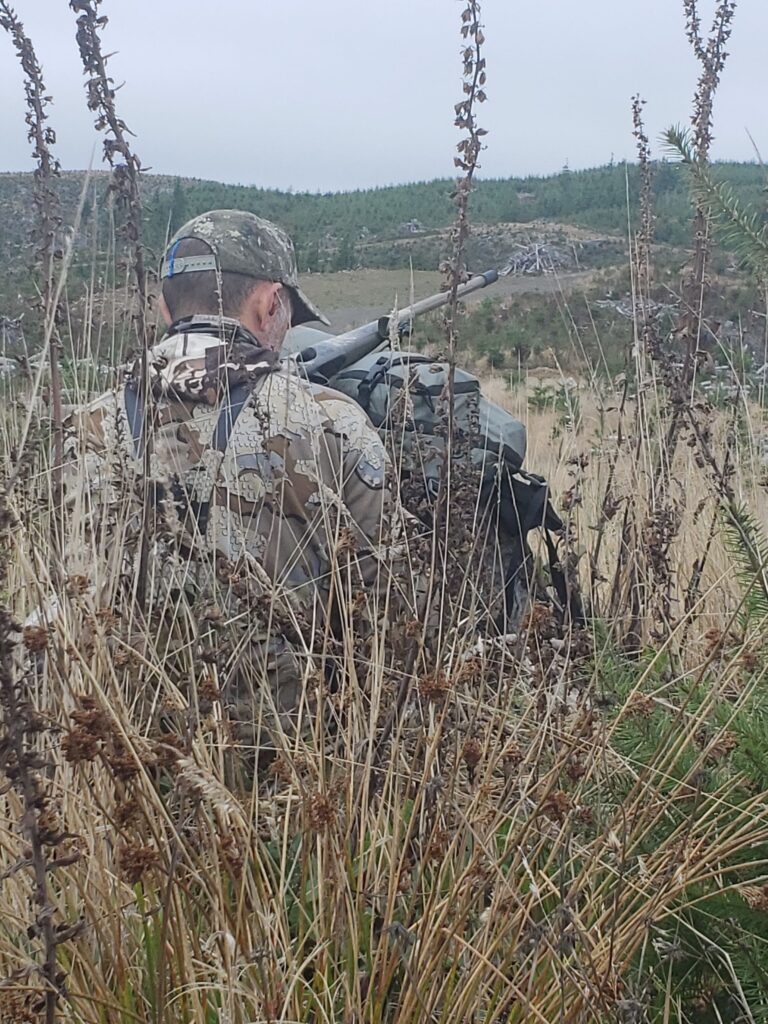
Typical terrain, vegetation, and afternoon light. Everything you see is steeper than it looks. Note the dense timber between bare hillsides. The road on the horizon is just over 500 yards from the photographer. At left, you can see fog starting to roll in from the Pacific Ocean.
Being so close to the Pacific Ocean means that our weather is unpredictable. Archery season can get hot with temperatures reaching 85 degrees mid-day. Muzzleloader season usually has temperatures reaching 50-60 degrees mid-day, with occasional rain. Rifle season is not bitterly cold, but rain is pretty much guaranteed.During any season, the grass can be wet with dew, so bring good gaiters and boots lined with Gore Tex or something similar. Cool air and fog can blow in from the coast at any time, so keep a light insulating layer in your pack. Due to our moisture and humidity, this layer should be synthetic instead of down. No matter what season you hunt, you’ll want the best rain gear and boots that money can buy.
Hunting Methods
Roosevelt Elk and black bears are among the toughest North American big game species. We specialize in calling big Roosevelt bulls for archery and muzzleloader hunters during the rut. For hunting either species with modern firearms, we use the spot-and-stalk method. We hunt elk in the timber as needed, and we may call for bears if the conditions warrant.
Rifles & Cartridges
Preparation
The hunter’s job is to anchor a large, potentially dangerous animal that could be several hundred yards away across a windy canyon. Ideally, you’ll do this with one shot. Here are some things to ponder as you get ready for that.
Choosing Binoculars & Spotting Scopes
Quality optics make a difference in spot-and-stalk hunting. We believe that it’s smarter to hunt with a $200 rifle and $2,000 binoculars than the opposite. Both roof-prism and porro-prism binoculars can work IF they have high-quality glass. Brands we trust include Leica, Swarovski, and Zeiss, but market for good binoculars is growing and excellent choices appear almost every day.
8x is a good minimum and is versatile enough for use in timber. 10x is good for glassing distant hillsides but can be harder to hold steady. Any binocular benefits from a tripod for extended use, especially those over 10x. Look for objective lenses (the ones closer to the game) of 40mm or greater. Smaller glasses are lighter and easier to carry but don’t perform as well at dawn and dusk.
Before you leave home, practice getting your binoculars on a distant object quickly. Most people spot an object, raise the binoculars to their eyes, then try to find the object. This method works poorly when it works at all, plus it’s show. Instead, spot the object, then move the glasses to your line of sight. If you do this correctly, the object will appear centered in your field of view as soon as you raise the binoculars. This is easy to learn with a few minutes of practice.
Choosing Rifles & Cartridges
The areas where we hunt are rarely more than 1,500 feet above sea level. They have plenty of dense brush, but it’s a mistake to confuse a Pacific Northwest hunt with brush hunting as found in the southern and eastern US. This is logging country. You can see game hundreds of yards away across clear cuts. You may spend time in the timber, but you,ll spend far more time on classic spot-and-stalk mountain hunting of the type that Jack O’Connor and Warren Page used to write about it just takes place within sight of the Pacific Ocean.
There are very few easy shots here. Some are offhand, fast, and close. Most are 300-500 yards, with a bit more time to get a hit. It’s also possible to take shots beyond 500 yards. In any case, bring a rifle that you can shoot well in a hurry and that you can hit with at long range. We like to see hunters with scoped bolt-action rifles that fire high-velocity cartridges with a flat trajectory and plenty of punch downrange. It’s even better if that rifle is worn from plenty of previous hunting.
A cartridge that can drop a 1,000-pound elk or anchor a bear RIGHT NOW can be the difference between passing up a shot and a trophy on your wall. We use various 300 magnums for our own hunting. We consider the 30-06 and the 7mm Remington Magnum to be the minimum for Roosevelt elk and black bear under the conditions we find where we hunt them. Some of our hunters have done well with lighter cartridges. Others have gone home empty-handed because they weren’t confident that their choice could handle a long shot at a big animal across a windy canyon. You don’t need a 338 or a 375, but they’re not out of place if you can shoot them well.
Preparing Your Rifle
Ensure that your rifle and load will shoot into 1 MOA or better out to at least 400 yards from the bench. (1 MOA is a 4.2 group at 400 yards.) A rifle and load that shoot 1 MOA at 100 yards may not shoot that well at longer distances, so testing is vital.
Once you find an accurate load, learn your drops. https://www.federalpremium.com/ballistics-calculator has good data for starting tests, but factory loads may not reach advertised velocities and handloads may not match velocities listed in manuals, so chronograph at least 10 rounds of the load you plan to use and use the correct G1 ballistic coefficient for your bullet.
Once you confirm and verify your drops, write them down where they’re easy to see quickly.
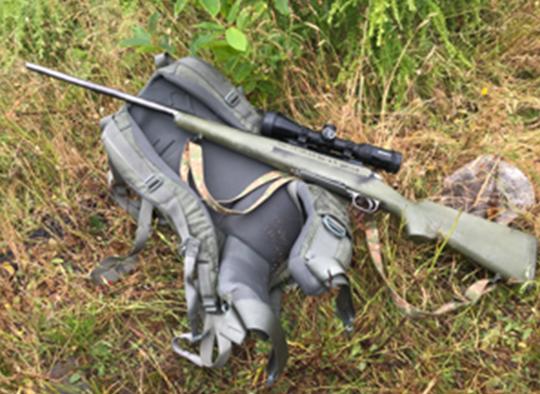
This hunter wrote his drops on the stock of his rifle with a Sharpie. Also, note that everything in this picture is wet from several hours of mist.
We zero for maximum point-blank range (MPBR) and keep our scopes set to the lowest power so we can get hits quickly out to about 250 yards. We also dial elevation for long shots rather than trying to use the reticle to hold over. This takes a scope with repeatable, accurate adjustments. We’ve had good luck with Nightforce and Huskemaw, but as with binoculars, the market for these scopes is growing and excellent choices appear every day.
You may hunt in timber, so choose a variable with a low end of not more than 4-5x. We like simple reticles that can be seen easily and used well in a hurry. Illuminated reticles are nice but not required. When budget is an issue, a solid fixed-power scope is far better than a variable that fogs or won’t hold a zero.
You also need a weather-resistant scope and Butler Creek (or equivalent) scope caps. Wet, cloudy weather here makes the gloom at each end of the day last longer, so legal shooting hours and the time when you can see to shoot can be two very different things. A good scope can add 45 minutes of hunting time to each end of the day, and scope caps will keep your scope dry enough that you can actually use it.
Your rifle should have a synthetic or laminated stock. Wood stocks can work IF they’ve been glass bedded and the barrel is free-floated. This helps with long-range accuracy but is more because rain and humidity can cause wood stocks to warp and shift your point of impact even at relatively short range.
Shot placement is the most important factor in taking game, but the bullet must also penetrate and stay together. We strongly believe that it’s unwise to scrimp on the one piece of gear that kills game, so we recommend the Nosler Partition, Barnes TTSX, Swift A-Frame, Berger VLD-Hunter, and other premium bullets.
Physical Preparation
Our elk hunts can be as strenuous as you want to make them but our bear hunts tend to be less challenging. No matter how strenuous the hunt, having limber joints and flexible muscles will make it easier. Our hunters and guides often spend a lot of time hiking on hilly terrain, so if nothing else, start walking NOW. As you get used to it, add a pack with a few pounds of gear and start walking up hills. Increase the load, distance, and incline until you can carry 25-30 pounds up and down hills for several miles several times a week without hurting the next day.
It also helps to build strength in your core and upper body. Several months before your hunt, start working on classic functional strength exercises, especially complex multi-joint moves like push-ups, dips, deadlifts, squats, chin-ups, overhead presses, lunges, kettle bell swings, etc. If you can’t get to a gym, then spend some time on calisthenics and standard body-weight exercises like push-ups, chin-ups, dips, and lunges.
Your entire body will thank you for doing this every night you spend in elk camp. And with any luck, you’ll use your new strength to pack out a huge rack or a bear hide and LOTS of meat.
Shooter Preparation
Learn to shoot from the positions that Jeff Cooper describes in The Art of the Rifle, especially offhand. Practice the post rest for mid-range shots and practice out to 400 yards from prone or a rest in case a long shot comes up.
Our thick brush and constant rain make tracking hard, so we want you to shoot until the animal is down. Learn to cycle the bolt quickly without getting out of position. You should be able to fire again within a few seconds or as soon as the crosshairs return to the target. Mastering the bolt stroke is key. Most people think of this as four movements: up, back, forward, and down. Instead, make it two: up-and-back, forward-and-down. The ability to run the bolt quickly from a rest while engaging long-range targets may keep you from losing a hard-earned trophy.
Mechanical rests are fine for load development, but you won’t hunt with one. Once you get good 400-yard groups, put the rest away and train under hunting conditions. Check your zero with a bipod, tripod, brush pile, backpack, or other improvised rest it may vary from your bench zero. Then practice. Just adding a bipod or tripod to your rifle does not guarantee hits. Accuracy with them requires specific technique executed properly. The same goes for improvised rests.
Before your hunt, learn to get into a solid position behind your preferred rest. Shoot from positions that include natural objects like brush piles, stumps, or rocks. These positions don’t have to be comfortable since you won’t be in them for long, but they do have to be solid. This is one of the keys to getting multiple hits in quick succession.
Learn to find positions that let the crosshairs return to the target naturally after a shot, then shoot like this as much as you can before your hunt. Even an air rifle or a 22 helps hone the skills you need. If you can’t shoot your hunting rifle, then dry fire and shoot a handgun the trigger control required to shoot handguns well pays huge dividends for rifle shooters.
Your Maximum Range
The ability to make 1 MOA groups from the bench is a foundation, but that’s all. You’ll lose some accuracy in the field but you can balance that by shortening the time you need to get into position, adjust your scope, and fire. Once you can make good groups under hunting conditions, speed up.
The following drill balances speed and accuracy. The targets are several paper plates set at odd intervals from 100 yards out to as far as you think you can hit them. Start with your rifle set up the way it will be when you hunt: fully loaded and your scope set at the lowest power. You may shoot from standing, kneeling, sitting, or prone, and you may change position at any time for any reason.
- Have a buddy call out which target to hit and the distance to it, then start the timer.
- Assume position. Deploy a bipod/tripod or use a rest if you want.
- If necessary, change the power on your scope and add elevation. The MPBR zero lets you skip this step for targets within about 250 yards.
- Shoot until you hit the plate three times.
Notes
- Your score is the time required to make three hits. Par time is 30 seconds.
- After you shoot this drill, return your scope to zero (if needed), set it back at the lowest power, and repeat the drill from a different position on a different target at a different distance.
- Vary this drill as much as you like. For instance, when you get good, sprint 50 yards between repetitions. But always look to balance speed and accuracy.
- Practice assuming position, adjusting your scope, and firing in that order until you can do them without thinking.
The range at which you can quickly hit a paper plate three times on command is your maximum effective range.
Shooting In the Field
Four things happen in shooting any big game animal.
- You see it.
- You decide whether it’s one that you want to take.
- You prepare to shoot.
- You shoot.
These things always happen in this order. In most hunting, you’ll do them very quickly, but in spot-and-stalk hunting, the first three steps can take much longer. Here is how to turn that time into an asset instead of a liability.
Seeing
You and your guide may spend days looking at game with binoculars and spotting scopes. When you glass, pick a spot near a stump, brush pile, or other natural rest, and create your firing position. Set up your tripod if you use one, put your rifle on top of your pack, or deploy the bipod legs so you’re ready to shoot. All of this helps reduce last-minute scrambling.
Team up with your guide. He will see more animals than you do and he’ll see them first. Use these opportunities to practice communicating the exact location of a specific animal. Even if the animal is not in season, have him talk you onto it. Then, when you’re looking at something do want to shoot, you can help each other find it quickly and efficiently.
Don’t use your rangefinder to check the distance to the animal you plan to shoot your guide will do that. Instead, use it to plan for possible shots. Check the distance to distinctive rocks, stumps, or other objects on the hillside in front of you. Decide which ones are at or near your maximum range. Now you know that you can engage anything closer without moving, and that you’ll have to move to engage anything farther.
Use your binoculars to pick apart the hillside in front of you. Good glass is extremely clear, so constantly adjust and readjust the focus so you can see individual blades of grass. This kind of looking quickly reveals little folds in the earth, low spots you hadn’t noticed, or maybe the tip of an antler. Practicing this on distant hillsides before your hunt comes in very handy later.
Judging
Once you see an animal, you decide whether you want to shoot. Whether you decide quickly or slowly, there will be an adrenalin rush that elevates your heart rate and causes shortness of breath. This can feel like panic. Nobody rises above it we fall to the level of our preparation but you’ll be well prepared if you’ve done the things described above.
Once you see an animal you might shoot, force yourself to take slow, deep breaths. This will slow your heart rate and reduce the effects of adrenalin. Keep breathing as you feel your heart slow down. You won’t be completely calm, but you can reduce your heart rate significantly, which makes it easier to shoot well.
Preparing
In spot-and-stalk hunting, you may have to move to take a shot. This can be a few yards or several miles but either will increase your heart rate and breath rate. Again, don’t let yourself get winded. Move quickly but make yourself breathe deeply as you move and as you prepare to shoot.
Find a good field rest and get into a solid position as you did in pre-season training. Turn the scope power to the correct level. When your guide tells you the range to the target, add the correct elevation.
And don’t forget to breathe.
Shooting
This is where you can throw away months of painstaking preparation. Breathe, take your time (quickly), and fire. Work the bolt hard and fast, and don’t stop shooting until the animal is down. All of this is a challenge, but you will meet it well if you prepare yourself and your equipment properly.
Again, there are very few easy shots here. Bring a rifle that you shoot well.